

*No-Sew* Easter Bunny Crochet Pattern!
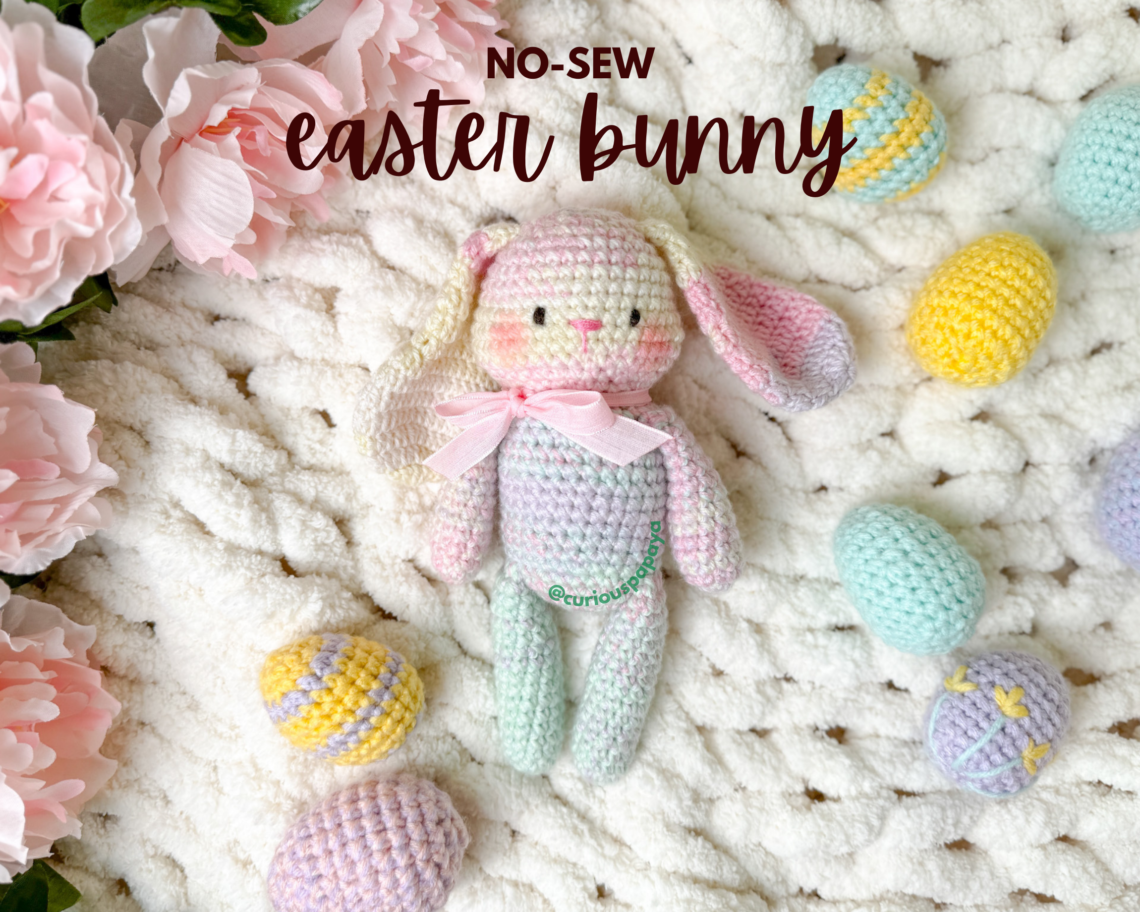
Happy Easter everyone!
NOTES:
- We will be working in a continuous rounds (a spiral) for everything but the ears which will be worked in joined rounds.
- This pattern is written in US terminology.
- Measurements: 8.5 in x 2.5 in [~22 cm x ~5 cm] if using the prescribed materials
- Gauge: Gauge is not particularly important for amigurumi, but please be sure to work double-stranded when instructed to. This will ensure that the ears (worked with a single strand) are proportional.
- Difficulty: Intermediate-beginner +
- Time: 2-3 hrs
MATERIALS:
- #3 light-worsted yarn - here, I’m using King Cole Beaches DK – 70% Acrylic 30% Polyamide, 279yds (255m) / 100g (3.5oz)
- Amour Crochet Hook (2.25mm)
- Amour Crochet Hook (4.0mm)
- Quick Locking Stitch Marker
- Darning Needle
- Patchwork Scissors (Mini)
- Yarn Ball Winder
- Small Pom Pom Maker
- poly-fil stuffing
- pink ribbon
- optional: blush and a q-tip & hot glue gun
ABBREVIATIONS:
blo: back loops only
ch: chain
dc: double crochet
dc-inc: double crochet increase
dc-dec: double crochet decrease
dec: sc decrease
flo: front loops only
inc: sc increase
sc: single crochet
slst: slip stitch
st(s): stitch(es)
PATTERN:
EARS:
Using your Clover Amour Hook (2.25 mm) hook and a single strand of DK yarn, make two.
Note: We will work the ears in joined rnds. The “ch 2” will count as a st.
- Round 1: Make a magic circle and ch 2 (this will count as your first dc), (dc) x11, slst into the first st to join the rnd [12]
- Round 2: ch 2, dc into the same st (with the ch 2, this will be your first dc-inc), (dc-inc) x11, slst into the first st to join the rnd [24]
- Round 3: ch 2, dc into the same st, 3 dc, (dc-inc, 3 dc) x5, slst into the first st to join the rnd [30]
- Rounds 4-6 (3 rounds total): ch 2, 29 dc, slst into the first st to join the rnd [30]
- Round 7: ch 2, dc into the next st 2 sts, dc-dec, (3 dc, dc-dec) x5, slst into the first st to join the rnd [24]
- Rounds 8-9 (2 rounds total): ch 2, 23 dc, slst into the first st to join the rnd [24]
- Round 10: ch 2, dc into the next st, dc-dec into the next st, (2 dc, dc-dec) x5, slst into the first st to join the rnd [18]
- Round 11: ch 2, 17 dc, slst into the first st to join the rnd [18]
- Round 12: ch 2, dc-dec, (dc, dc-dec) x5, slst into the first st to join the rnd [12]
- Round 13: ch 2, 11 dc, slst into the first st to join the rnd [12]
- Do not stuff. Fasten off and leave a short tail. We will crochet the ears into the head and there will be no sewing.
ARMS:
Using your Clover Amour Hook (4.00 mm) and two strands of DK yarn, make two.
- Round 1: make a magic circle and (sc) x6 [6]
- Round 2: (inc) x6 [12]
- Rounds 3-12 (10 rounds total): sc all around [12]
- Fasten off and leave a short tail. Lightly stuff.
LEGS:
Using your Clover Amour Hook (4.00 mm) and two strands of DK yarn, make two.
- Round 1: make a magic circle and (sc) x6 [6]
- Round 2: (inc) x6 [12]
- Rounds 3-16 (14 rounds total): sc all around [12]
- Fasten off and leave a short tail. Lightly stuff.
HEAD/BODY:
Use your Clover Amour Hook (4.00 mm) and two strands of DK yarn.
- Round 1: make a magic circle and (sc) x6 [6]
- Round 2: (inc) x6 [12]
- Round 3: (sc, inc) x6 [18]
- Round 4: (sc, inc, sc) x6 [24]
In the next round, we will crochet in the ears (the image below shows going through 3 layers). Watch a helpful tutorial HERE!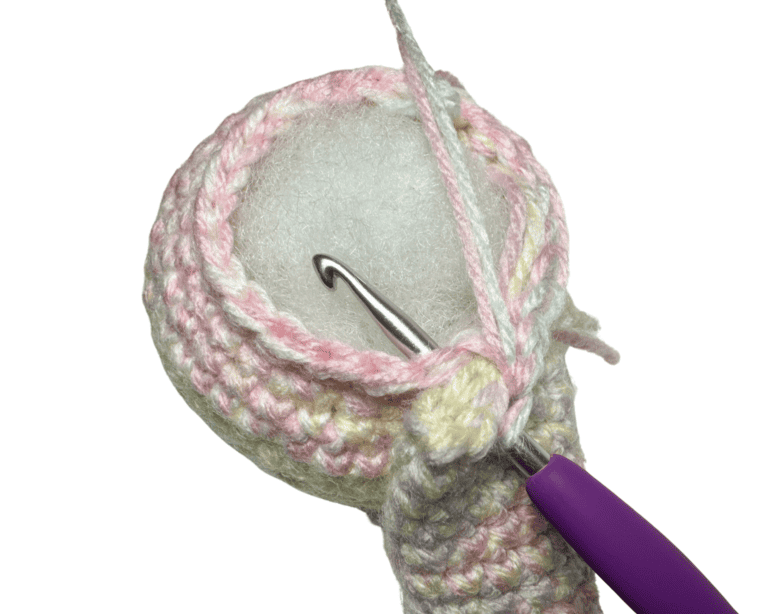
- Round 5: Flatten the opening of the ear and insert your hook through both loops of both layers. Then, go through both loops of the head (you will have 6 loops on your hook). Working across the ear, make 4 sc, inc, then (3 sc, inc) x2, join the other ear and make 4 sc, inc, then (2 sc, inc) x2 [30]
- Round 6: (2 sc, inc, 2 sc) x6 [36]
- Rounds 7-10 (4 rounds total): sc all around [36]
Add 3-4 sc to align the start of the round with the side of the ear that is closer to the face (depending on your tension, you may need to adjust as needed). In the next round, we will create the cheeks.
- Round 11: 4 inc, 10 sc, 4 inc, 18 sc [44]
Mark the side of the head (with the cheeks facing protruding out) with a stitch marker to note the “front” of the head.
- Round 12: sc all around [44]
- Round 13: (20 sc, dec) x2 [42]
- Round 14: (5 sc, dec) x6 [36]
- Round 15: (2 sc, dec, 2 sc) x6 [30]
- Round 16: (3 sc, dec) x6 [24]
Stuff the head and fill out the two cheeks well. Continue onto the body.
- Round 17: (flo) – sc all around [24]
In the next round, we will crochet in the arms. Add or undo a few sc to align the start of your round with the start of the ear (the image below shows the alignment of limbs).
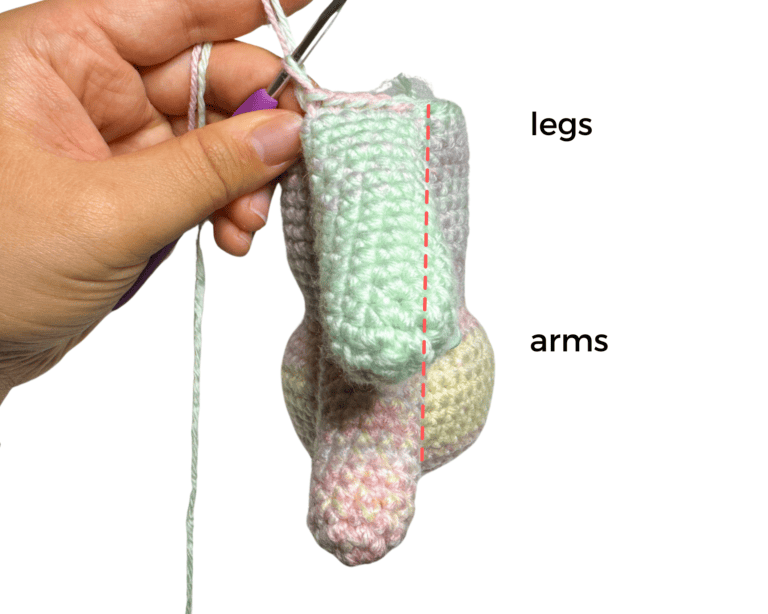
- Round 18: Flatten the opening of the arm and insert your hook through both loops of both layers. Then, go through both loops of the body (you will have 6 loops on your hook). Working across the arm, make 6 sc, make 6 sc in between, join the other arm and make another 6 sc across, 6 sc [24]
- Round 19: sc all around [24]
- Round 20: (7 sc, inc) x3 [27]
- Rounds 21-29 (9 rnds total): sc all around [27]
In the next round, we will crochet in the legs. Add or undo a few sc to align the start of your round with the start of the arm.
- Round 30: Flatten the opening of the leg and insert your hook through both loops of both layers. Then, go through both loops of the body (you will have 6 loops on your hook). Working across the leg, make 6 sc, make 8 sc in between, join the other arm and make another 6 sc across, 7 sc [27]
- Round 31: (7 sc, dec) x3 [24]
- Round 32: (sc, dec, sc) x6 [18]
- Round 33: (sc, dec) x6 [12]
Fasten off and leave a tail. Stuff the body one last time. Go through the flo with your yarn needle and pull the hole closed.
POM POM TAIL:
Use the pink Clover pom pom maker and DK yarn.
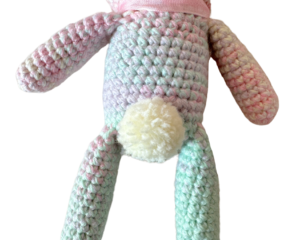
- Step 1: Create a pom pom using the maker. Watch a helpful tutorial HERE!
- Step 2: Trim the edges into a neat ball.
- Step 3: Secure onto the back of the body 2 rounds above the legs with hot glue.
FACIAL FEATURES:
For all embroidered features, begin by weaving into the side of the head and leave a short yarn tail to secure into a knot at the end. Then, weave them into the head.
- Nose: Cut a long strand of pink embroidery thread. Create a nose 2 sts wide between rounds 11-12. Weave over it several times to make it thicker.
- Mouth: With the same thread, create a line for the mouth, 2 sts tall, centered underneath the nose.
- Eyes: Cut a long strand of dark brown embroidery thread and create two eyes spanning round 11 (2 rounds away from each side of the nose). Weave over it several times to make the shape thicker and rounder.
FINISHING TOUCHES:
- Blush: Apply a bit of pink blush on each cheek to make the adorable bunny blush!
- Ribbon: Tie a ribbon around its neck and double knot it. Trim the ends at an angle and carefully light the edges to prevent them from fraying.